Around 500 websites are built on WordPress every day!
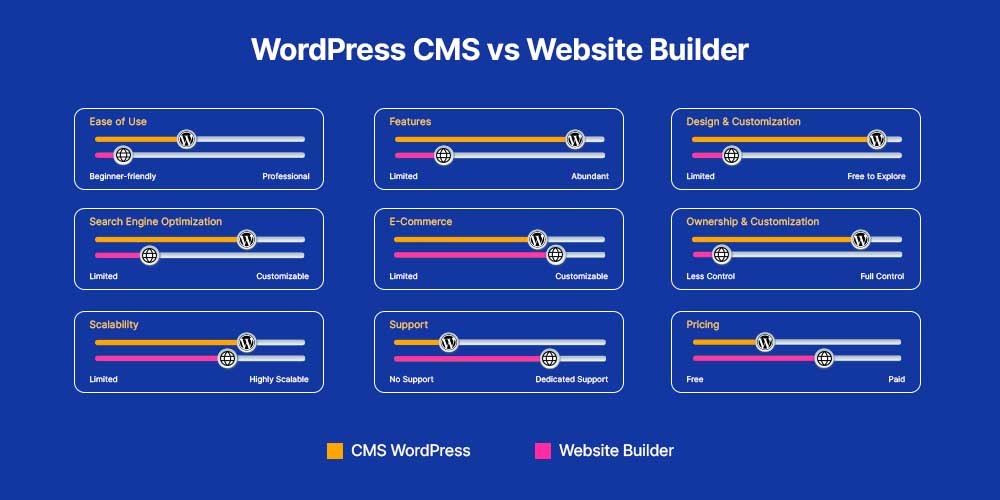
With 810 million websites (representing 43% of the internet), WordPress holds an excellent reputation and a loyal customer base. Hence, it is arguably the most reliable way to design and run your website.
Having said that, launching a WordPress website is easy and safe. In this article, we will walk you through 7 easy steps to launch and run a website on WordPress.
Step 1: Shape your requirements and central content idea.
Before launching a WordPress site, it is crucial to determine the type of website you intend to create. This could include a blog, an eCommerce site, a company profile, or any other format.
Select a topic for your website focusing on a particular niche, such as photography, travel, or food. This will make content creation more accessible and more enjoyable.
Next, determine your website’s ultimate goal, whether it is for monetization or leisure. Consistency is key, regardless of your goal.
Lastly, identify your target audience, which will influence your content’s style, tone, and format.
Step 2: Get a suitable domain name.
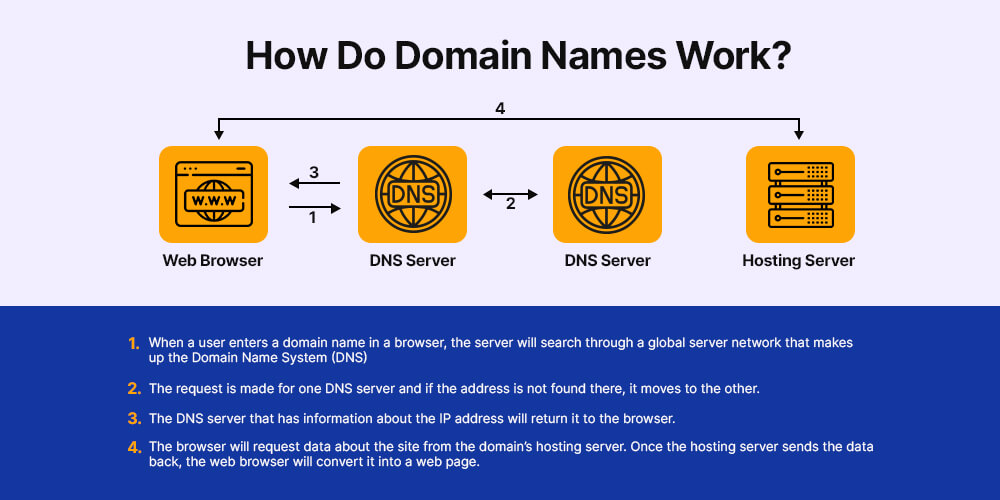
Choosing a domain name is an important step that requires careful consideration since it represents your brand. Take inspiration from popular websites like Wikipedia, YouTube, and Netflix, which have short, unique, and easy-to-remember names. Avoid using complicated names that could discourage visitors.
After selecting a suitable name, it’s time to verify its availability and buy the domain. Hostinger offers domain registration for various TLDs such as .store, .online, .xyz, and .com at an affordable price of $9.99 and even lower for some TLDs like .store.
Additionally, they provide reasonable pricing for country-code TLDs like .co.uk.
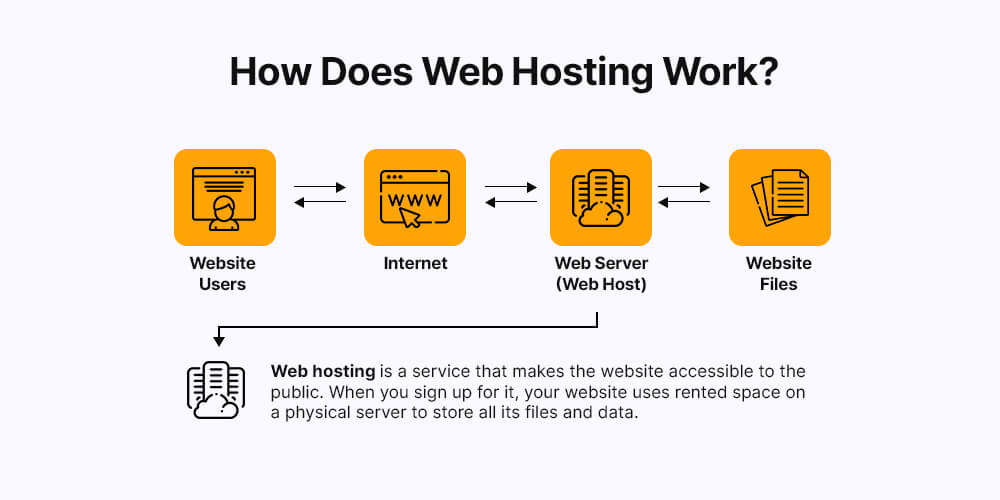
Step 3: Sign-up for a web hosting service.
While choosing a web hosting service provider, consider the following pointers:
- Sort your requirements- From the number of resources you will need and the plans to scale your website in the future, research and prepare a road map for your project.
- Stable and operational- It is essential that your hosting service provider is stable and available 24/7.
- Support system- If your website encounters issues or goes down, it’s essential to seek assistance from the customer support team.
- Easy to use- Numerous website owners lack programming experience; therefore, the control panel must be user-friendly and easy to navigate.
- Affordability- When running a website, consider budget and cost in the long term. It’s best to avoid overpaying for a web host that doesn’t meet your needs. For beginners, we recommend selecting the most affordable web hosting companies.
Step 4: Install WordPress Core.
Installing WordPress is an easy job. Refer to the ‘Before You Install’ to check a few requirements.
Download and extract WordPress manually.
Download and unzip the files from wordpress.org/download/ :
- If you upload WordPress to a remote web server, download the WordPress package to your computer with a web browser and unzip the package.
- If you use FTP, skip to the next step – uploading files is covered later.
- If you have shell access to your web server and are comfortable using console-based tools, you may wish to download WordPress directly to your web server using wget (or lynx or another console-based web browser) if you want to avoid FTPing: wget https://wordpress.org/latest.tar.gz
- Then extract the package using: tar -xzvf latest.tar.gz
The contents of the WordPress package will be extracted to a folder named “WordPress” within the directory where you downloaded the latest.tar.gz file.
Set up WordPress with a hosting provider.
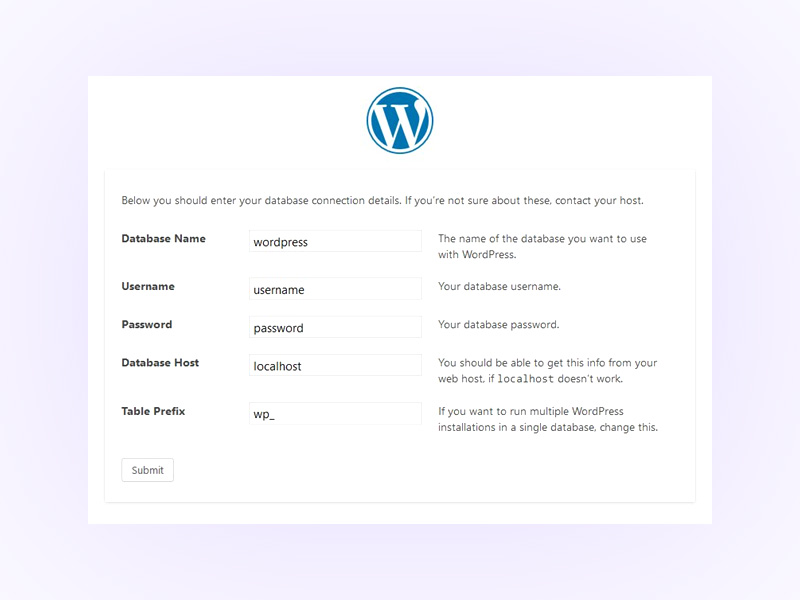
A WordPress database may already be set up for you if you use a hosting provider, or an automated setup option may be available. For information on whether you must manually establish one, see your control panel or the support pages of your hosting provider.
Using phpMyAdmin is how you create your WordPress username and database if you decide that you’ll need to create one manually. Refer to the article Creating Database for WordPress for more information on other tools like Plesk, cPanel, and Using MySQL Client.
You can install WordPress in an already-used database if you only have one; just be careful to provide your tables with a unique prefix to prevent overwriting any database tables.
Setting configuration file:
In case WordPress is unable to locate the wp-config.php file, it will notify you and provide an option to generate and modify the file automatically. Alternatively, you can access wp-admin/setup-config.php on your web browser to perform this task manually.
WordPress will prompt you to enter the database information, which it will then save to a newly created wp-config.php file. If successful, you can proceed with the installation; otherwise, you must create, modify, and upload the wp-config.php file manually.
Step 5: Choose and activate a theme.
Once you are done downloading and installing, it’s time to add to the looks and feel of your website. This is where themes play an essential role.
Keep in mind that each type of website requires a different level of complexity and layout. For example, a blog will require a more straightforward layout and fewer functionalities than an e-commerce store.
And here is an amazing thing about WordPress- there are over 31,000 themes (both free and premium) for you to choose from.
Installing your store’s theme:
Here are the steps to install the theme onto your store:
- Login to your WordPress Dashboard.
- Hover on the Appearance tab.
- Select the theme and click on the Add New button.
Or you can search for the theme to add and press the Install button.
Step 6: Pick up plugins and customize your website.
After launching your WordPress site, you must select and install plugins. WordPress offers numerous plugins that can enhance your website’s functionality, such as admin tools, security features, and much more.
Here are some plugins to start with:
1. WooCommerce: Turn your website into an e-commerce store with the WooCommerce plugin.
Note: Choosing a platform that offers secure and seamless transactions is recommended, such as WooCommerce web hosting if you plan to sell products online.
2.
Yoast SEO: One of the top plugins for Search Engine Optimization (SEO) is available, which can assist you in publishing high-quality, search-optimized content.
3.
W3 Total Cache: The plugins help your website load faster on your visitor’s system on a frequent visit.
4.
Key two Factor Authentication: This security plugin safeguards your website from unauthorized access by enabling two-factor authentication. It requires you to verify your identity through a secondary device.
Steps to install plugins:
- Go to the Plugin section from your WordPress dashboard.
- Locate the Add New button at the top of the page.
- Write the plugin’s name in the search bar and click the Install Now button.
Note: If you have installed the plugin in advance, click the Upload Plugin button, choose the file from your computer, and hit the Install Now button.
- After the installation, click the Activate Plugin button.
Step 7: Keep on updating your website.
Regular updates are crucial for your WordPress website’s performance, security, and functionality. WordPress constantly evolves; updates contain bug fixes, security patches, and new features.
Your website may become vulnerable to security threats and hacking attempts without regular updates. Also, outdated plugins and themes can conflict with new versions of WordPress, causing errors and crashes. Regular updates ensure that your website is compatible with the latest version of WordPress and its plugins and themes, keeping your website running smoothly. Additionally, updating your website regularly can improve its search engine optimization (SEO) ranking by providing fresh content and improving website speed and performance.
Conclusion.
You now understand how to start a WordPress website! It’s not difficult at all, but preparing it requires careful thought because there are so many details to consider.
We hope this short tutorial helps you set up your WordPress website. For more such resources, visit https://wpexcel.cedcommerce.com/blog-wordpress-wpexcel/
Post Views: 5,017


